-
[자연어처리] 기계 번역 seq2seq Encoder-Decoder Model (1) Train step자연어처리 공부 2023. 12. 26. 14:57
▶︎ seq2seq Model 이란?
→ 말에서 짐작할 수 있듯 입력 시퀀스에서 출력 시퀀스를 생성하는 language model 중 하나입니다. (language model 은 쉽게 말해서 다음 단어를 예측하는 모델, 정확하게는 다음 단어의 확률을 예측하는 모델입니다)
→ 언어별 모델을 만들 필요없이, 동일한 모델로 적용이 가능합니다
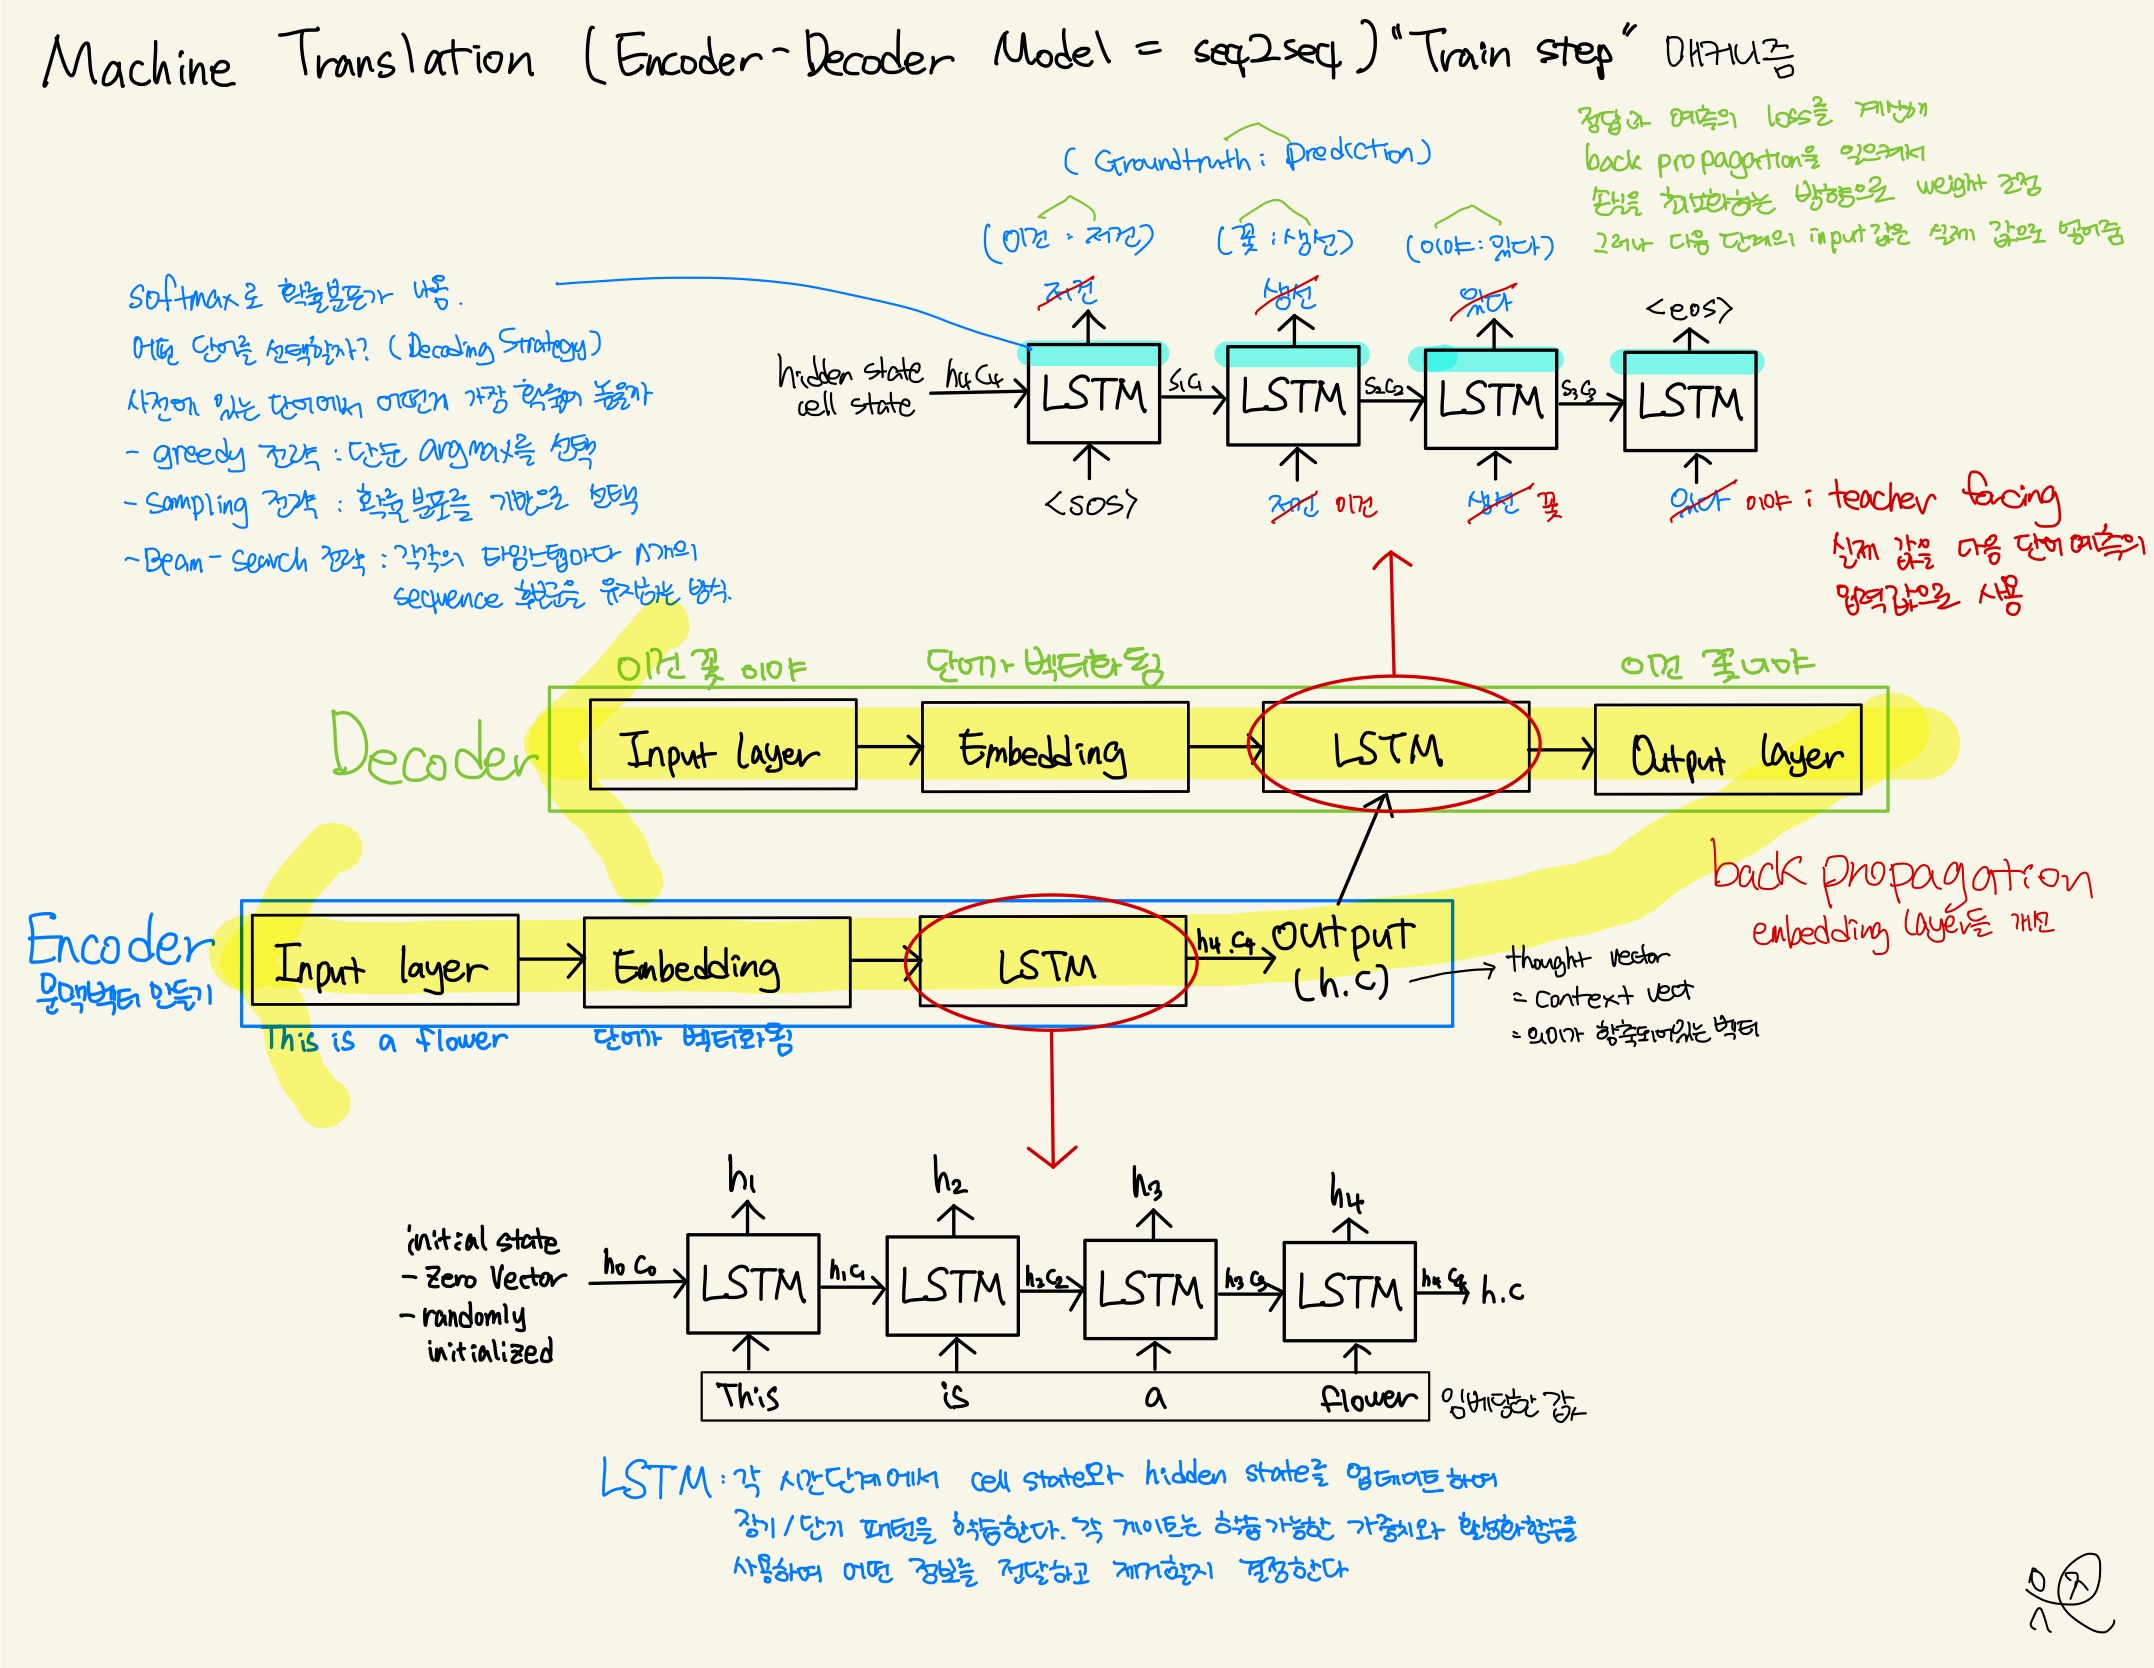
▶︎ seq2seq 의 구조는?
→ 크게 인코더와 디코더로 나뉘어집니다
→ 인코더 (Encoder) : 하이터파라미터로 원하는 길이를 정하고 패딩으로 빈 부분을 채워서 고정된 크기의 벡터로 인코딩합니다. 워드 임베딩은 입력 시퀀스를 의미와 정보로 담아 벡터로 만들어주는 과정입니다. 그 후 LSTM 모델에 넣어 각 time step에서 cell state와 hidden state를 업데이트하여 장기/단기 패턴을 학습합니다. 각 게이트는 학습가능한 가중치와 활성화함수를 사용하여 어떤 정보를 전달하고 제거할지 결정합니다. 인코더의 최종 출력된 thought vector(h,c) 를 디코더에 넘겨줍니다.
→ 디코더 (Decoder) : 인코더에서 생성된 벡터를 디코더 LSTM 모델에 넣어 teacher forcing을 해줍니다. teacher forcing은 이전 time step의 output을 input으로 사용하는 대신 실제 정답(ground truth)을 input으로 사용합니다.(train step에서만 teacher forcing을 사용하고 실제 inference할 때는 전 단계의 output을 그대로 사용합니다.) 정답과 예측한 값의 loss를 계산해 back propagation으로 손실을 최소화하는 방향으로 weight를 조정합니다. 최종 확률분포가 나온 후 greedy전략, sampling전략, Beam-search전략 중 하나를 택해 출력 시퀀스를 최종적으로 반환합니다.
▶︎ 주의할 점
→ 번역이라는 것은 A 언어를 B 언어로 바꾸는 것이기 때문에 언어별로 토큰화해야 합니다. 토큰화할 때 앞과 뒤를 구분하기 위한 팻말 <sos>, <eos> 때문에 필터링에 조심해야 한다.
→ 인코딩은 thought vector 생성이 목적이므로 토큰을 최대한 output layer에 가깝게 하여 정확한 h,c를 위해 패딩을 앞으로 한다.
→ 디코딩은 teacher forcing을 해야하니 0 에 나오면 학습을 할 수 없으므로 패딩을 뒤로 준다.
→ 단어를 임베딩할 때 pre-trained된 모델을 가지고 오면 대규모 텍스트 코퍼스에서 미리 학습된 워드 임베딩을 사용할 수 있기 때문에 더 풍부한 의미와 정보가 담긴 벡터를 사용할 수 있습니다. 우리가 가진 적은 데이터로 풍부한 의미를 담은 일반화된 단어를 사용할 수 있습니다.
→ teacher forcing은 train 에서 사용되고 inference할 때는 이전 time step의 output을 input으로 사용하는 text generation 기법을 사용해야 합니다.
※ 실습의 간편성과 이해도를 위해 2개의 영어 문장을 한국어로 번역하는 것을 실습합니다. 학습 성능이 좋은게 이상합니다. 저는 단지 기계번역을 실습해보고 단계를 파악하기 위해 글을 썼지 모델 성능이 목적이 아닙니다. 언어 모델은 기본적으로 정말 정말 정말 대량의 데이터를 가지고 학습합니다. 언어 모델의 성능은 데이터양과 질, 모델의 종류, 하이퍼파라미터 등에 좌우됩니다.
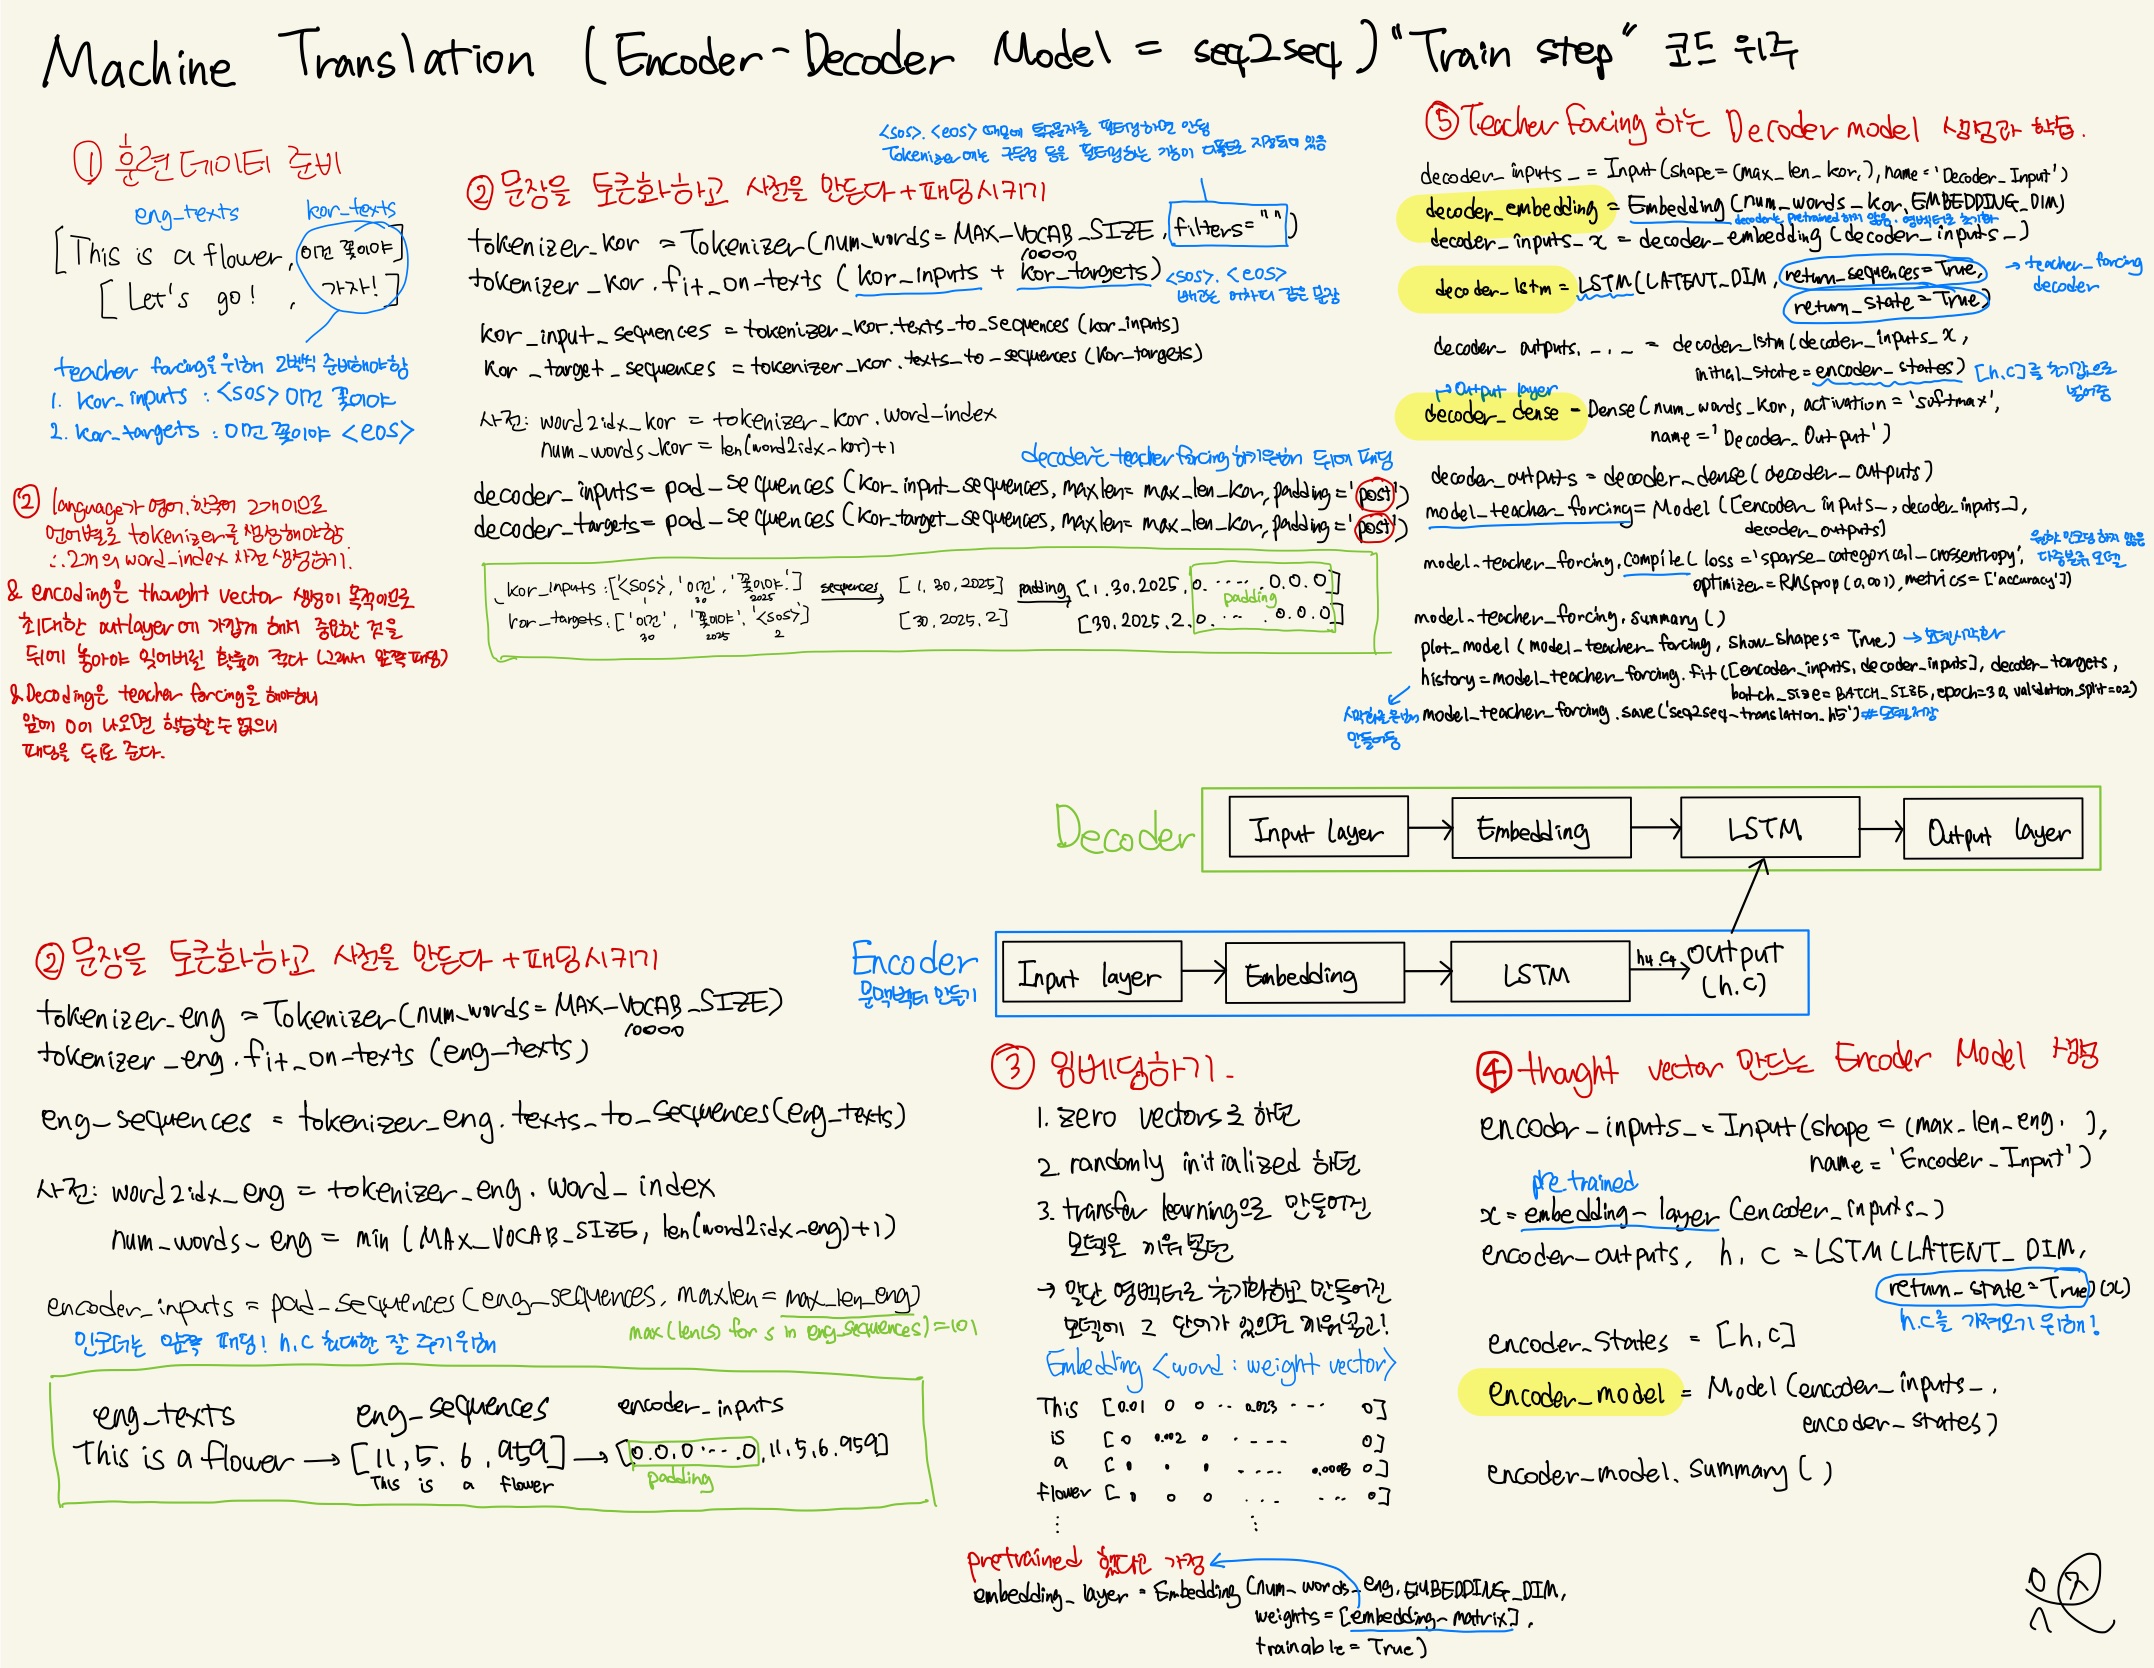
1. 필요한 라이브러리 불러오기
import numpy as np
import pandas as pd
import matplotlib.pyplot as plt

import tensorflow as tf
from tensorflow.keras.models import Model
from tensorflow.keras.layers import Dense, Embedding, Input, LSTM, Bidirectional

from tensorflow.keras.preprocessing.text import Tokenizer
from tensorflow.keras.preprocessing.sequence import pad_sequences
from tensorflow.keras.utils import to_categorical
from tensorflow.keras.optimizers import RMSprop
from tensorflow.keras.utils import plot_model
2. 데이터 준비
BATCH_SIZE = 64
MAX_VOCAB_SIZE = 10000
EMBEDDING_DIM = 100
LATENT_DIM = 512

eng_texts = ["This is a flower.", "Let's go!"]
kor_inputs = ["<sos> 멈추는 건 너무 어려워.","<sos> 가자!"]
kor_targets = ["멈추는 건 너무 어려워. <eos>","가자! <eos>"]
3. 번역 input의 영어 문장을 토큰화하고 숫자 시퀀스로 바꾸고 패딩을 시킵니다.
# 토큰화하기
tokenizer_eng = Tokenizer(num_words=MAX_VOCAB_SIZE)
tokenizer_eng.fit_on_texts(eng_texts)

# 숫자 시퀀스로 변환하기
eng_sequences = tokenizer_eng.texts_to_sequences(eng_texts)

# 영어 사전 만들기
word2idx_eng = tokenizer_eng.word_index

num_words_eng = min(MAX_VOCAB_SIZE, len(word2idx_eng) + 1)
max_len_eng = max(len(s) for s in eng_sequences)

# 패딩시키기, encoder 는 thought vector 생성 목적이므로 pre(default) 로 padding
encoder_inputs = pad_sequences(eng_sequences, maxlen=max_len_eng)
4. 번역 output의 한국어 번역 문장을 토큰화하고 숫자 시퀀스로 바꾸고 패딩을 시킵니다.
# 토큰화하기
tokenizer_kor = Tokenizer(num_words=MAX_VOCAB_SIZE,  filters="")
tokenizer_kor.fit_on_texts(kor_inputs +  kor_targets)

# 숫자 시퀀스로 변환하기
kor_input_sequences  \
    = tokenizer_kor.texts_to_sequences(kor_inputs)
kor_target_sequences \
    = tokenizer_kor.texts_to_sequences(kor_targets)

# 한국어 사전 만들기
word2idx_kor = tokenizer_kor.word_index

num_words_kor = len(word2idx_kor) +1
max_len_kor = max(len(s) for s in  kor_target_sequences)

# 패딩하기, decoder 는 teacher forcing 을 해야하므로 post 로 padding
decoder_inputs = pad_sequences(kor_input_sequences, maxlen=max_len_kor, padding="post")
decoder_targets = pad_sequences(kor_target_sequences, maxlen=max_len_kor, padding="post")
5. 영어 임베딩 레이어 만들기 (encoder 와 decoder 의 Embedding layer 에 transfer learning으로 pre-trained embedding weight 를 초기값으로 가져와도 됨. 하지만 여기서는 안했다고 가정하고 진행)
embedding_layer = Embedding(num_words_eng, EMBEDDING_DIM)6. thought vector 만드는 Encoder Model 생성
- encoder 와 decoder 의 embedding, lstm 및 dense layer 를 training 할 목적의 model 작성
- encoder 는 decoder 에 states [h, c] 만 전달
- prediction 을 위한 model 은 training model 에서 만들어진 layer 들의 weight 를 이용하여 별도 작성
# Encoder
encoder_inputs_ = Input(shape=(max_len_eng, ), name='Encoder_Input')

x = embedding_layer(encoder_inputs_)
encoder_outputs, h, c = LSTM(LATENT_DIM, return_state=True)(x)

# encoder 는 hidden state and cell state 만 decoder 로 전달 --> thought vector
encoder_states = [h, c]

encoder_model = Model(encoder_inputs_, encoder_states)
encoder_model.summary()
7. Teacher forcing 하는 Decoder Model 생성
# decoder 는 [h, c] 를 initial state 로 사용
decoder_inputs_ = Input(shape=(max_len_kor,), name="Decoder_Input")

# decoder word embedding 은 pre-trained vector 를 사용 않음
decoder_embedding = Embedding(num_words_kor, EMBEDDING_DIM)
decoder_inputs_x = decoder_embedding(decoder_inputs_)

# decoder for teacher-forcing
decoder_lstm = LSTM(LATENT_DIM, return_sequences=True, return_state=True)
# initial state = encoder [h, c]
decoder_outputs, _, _ = decoder_lstm(decoder_inputs_x,
                                     initial_state= encoder_states)
# final layer
decoder_dense = Dense(num_words_kor, activation='softmax', name='Decoder_Output')
decoder_outputs = decoder_dense(decoder_outputs)

# Teacher-forcing 모델 생성
model_teacher_forcing = Model([encoder_inputs_, decoder_inputs_],  decoder_outputs)

#model compile and train
model_teacher_forcing.compile(loss='sparse_categorical_crossentropy',
                              optimizer=RMSprop(0.001), metrics=['accuracy'])

model_teacher_forcing.summary()
8. Teacher forcing 시각화
plot_model(model_teacher_forcing, show_shapes=True)9. Teacher forcing 학습
history = model_teacher_forcing.fit([encoder_inputs, decoder_inputs],
                                    decoder_targets, batch_size=BATCH_SIZE,
                                    epochs=30, validation_split=0.2)
10. 성능지표 accuracy, loss 시각화
# plot some data
fig, (ax1, ax2) = plt.subplots(1, 2, figsize=(12, 4))
ax1.plot(history.history['loss'], label='loss')
ax1.plot(history.history['val_loss'], label='val_loss')
ax1.legend()

# accuracies
ax2.plot(history.history['accuracy'], label='acc')
ax2.plot(history.history['val_accuracy'], label='val_acc')
ax2.legend()
plt.show()
참고 자료 : 인프런 [딥러닝을 활용한 자연어 처리 (NLP) 과정 (기초부터 ChatGPT까지)] : 실습 - Transformer 번역기 분석 - Part1 지식공유자: YoungJea Oh 해당 강의를 참고하여 정리하였습니다.
'자연어처리 공부' 카테고리의 다른 글
[자연어처리] N-gram으로 아이오아이 너무너무너무 언어모델 학습하기. 다음에 올 가사 생성하기 (0) 2024.01.03 [자연어처리] Text-CNN 구현하기 (코드 위주) (0) 2024.01.02 [자연어처리] 문자를 숫자로 변환하는 방법 (BOW, TF-IDF, Word-Embedding) (0) 2024.01.02 [자연어처리] Word2Vec 의 모든 것 (1) 2023.12.26 [자연어처리] 기계 번역 seq2seq Encoder-Decoder Model (2) Inference step (1) 2023.12.26